Looking for help?
Child be a Champ
Be a Champ – Engagement Activity Module Overview
Be a Champ is an interactive engagement feature within the Fellowship section. It allows church administrators to create and publish activity-based challenges that members can participate in directly through the mobile app.
Activities can invite members to respond with a variety of media types, making it ideal for contests, testimonials, devotional prompts, selfie campaigns, and more.
Who Is This Guide For?
This guide is intended for administrators and fellowship coordinators who create and manage Be a Champ activities. For member participation instructions on the mobile app, please refer to the separate Member Guide.
Accessing Be a Champ
- Log in to the CMS using your administrator credentials.
- From the left navigation menu, click Fellowship.
- Select Be a Champ from the sub-section menu.
- You will see the activity creation and management interface.
💡 TIP: You can view all previously created activities from this same screen. Use the list to edit, activate, or deactivate existing entries.
Creating a New Activity
To create a new Be a Champ activity, fill in all the required fields on the form. Each field is described below.
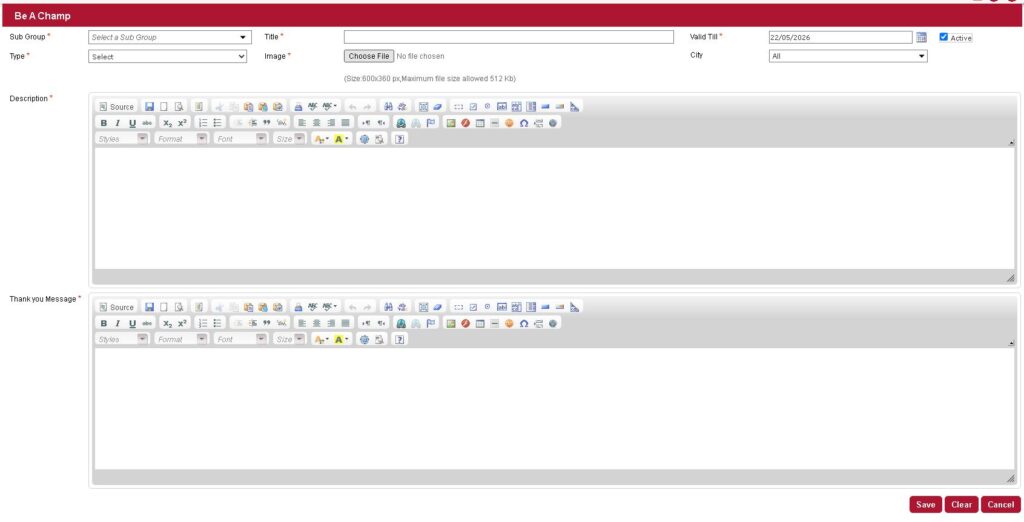
| Field | Required? | Description |
|---|---|---|
| Sub Group | Yes | Select the fellowship sub-group this activity belongs to. Members of the selected group will see this activity in their app. |
| Title | Yes | Enter a clear, engaging title for the activity. This is the headline members will see in the mobile app. |
| Type | Yes | Choose the response type members will submit. Options include: Single Image, Multiple Images, Text Response, Audio, and Video. |
| Image | Yes | Upload a banner or cover image for the activity. Accepted size: 600×360 px. Maximum file size: 512 KB. Supported format: JPG/PNG. |
| Valid Till | Yes | Set the deadline for member participation. After this date, submissions will no longer be accepted. Format: DD/MM/YYYY. |
| City | No | Optionally restrict activity visibility to members in a specific city. Select ‘All’ to make it visible to all locations. |
| Active | No | Toggle this checkbox to publish or unpublish the activity. Only active activities are visible to members in the app. |
Description (Rich Text Editor)
The Description field uses a full-featured rich text editor. This is the main content area where you explain the activity to members. You can:
- Format text with Bold, Italic, Underline, and Strikethrough
- Apply headings, paragraph styles, and font sizes
- Create bulleted and numbered lists
- Insert tables, links, special characters, and horizontal rules
- Align text (left, center, right, justify)
- Add color to text or background highlights
- Switch to Source view to edit raw HTML directly
📝 EXAMPLE: Use the Description to explain activity rules, deadlines, prizes, and how members should participate. List numbered rules clearly and use formatting to highlight key dates.
Thank You Message (Rich Text Editor)
This message is shown to members after they successfully submit their entry. Use it to:
- Confirm receipt of their submission
- Express appreciation and encouragement
- Provide next steps or additional information
Example: “You have successfully submitted your selfie. Thanks for your submission.”
✨ BEST PRACTICE: Keep the Thank You message warm, short, and affirming. Members appreciate immediate confirmation that their submission was received.
Activity Response Types
When creating an activity, you select the type of response you want members to submit. Each type is designed for a different kind of engagement:
| Response Type | Use Case and Notes |
|---|---|
| 🖼️ Single Image | Member uploads one photo. Ideal for selfie contests, scripture verse photos, or event participation photos. |
| 🖼️ Multiple Images | Member uploads several photos in a single submission. Ideal for event coverage, testimonial albums, or collages. |
| 📝 Text Response | Member types a written response. Ideal for prayer requests, testimonials, opinions, or reflection prompts. |
| 🎤 Audio | Member records or uploads an audio clip. Ideal for spoken testimonials, prayer recordings, or scripture readings. |
| 🎥 Video | Member uploads a short video. Ideal for video testimonials, worship performances, or activity demonstrations. |
⚠️ NOTE: The response type cannot be changed after an activity is published and members have started submitting. Choose carefully before clicking Update.
Publishing and Managing Activities
Saving / Updating an Activity
- Review all fields for accuracy.
- Ensure the Active checkbox is ticked if you want the activity visible immediately.
- Click the Update button (bottom right) to save and publish.
- A confirmation will appear upon successful save.
Previewing the Activity Image
After uploading an image, click the View button next to the Image field to preview how the banner will appear to members in the app.
Activating and Deactivating
- To make an activity visible to members: ensure the Active checkbox is checked before saving.
- To hide an activity from the app without deleting it: uncheck the Active checkbox and click Update.
- Expired activities (past the Valid Till date) will stop accepting new submissions automatically.
Clearing or Cancelling
- Clear: Resets all fields in the current form to blank. Use this to start over.
- Cancel: Discards changes and returns you to the previous screen without saving.
⚠️ CAUTION: Clicking Clear cannot be undone. All unsaved content in the form will be permanently erased.
Image Upload Guidelines
| Parameter | Requirement |
|---|---|
| Dimensions | 600 × 360 pixels (landscape orientation) |
| Maximum File Size | 512 KB |
| Recommended Format | JPG or PNG |
| Content Tips | Use bright, clear imagery. Include activity name or key visual cue. Avoid text-heavy images. |
| After Upload | Click the View button to preview the image before saving the activity. |
Step-by-Step: Creating Your First Activity
- Open the Form: Navigate to Fellowship > Be a Champ in the CMS.
- Select Sub Group: Click the Sub Group dropdown and select the intended fellowship group.
- Enter the Title: Type a concise and motivating title.
- Choose the Response Type: Select from the Type dropdown.
- Upload a Cover Image: Click Choose File, select your image (600×360 px, max 512 KB).
- Set Valid Till Date: Click the calendar icon and select the last participation date.
- Set City (Optional): Select a specific city or leave as All.
- Write the Description: Enter all information members need to participate.
- Write the Thank You Message: Write a short, warm message.
- Activate and Save: Check the Active box, then click Update.
✅ SUCCESS: Once published, members in the selected Sub Group and City will immediately see the activity in the Fellowship section of their mobile app.
How Members Participate (Mobile App)
- The member opens the mobile app and navigates to the Fellowship section.
- They tap Be a Champ to see active activities.
- They tap on the activity to view the full description and rules.
- They tap Participate or Submit and follow prompts to upload their response.
- After submitting, they see the Thank You Message you configured.
📱 NOTE: Members cannot edit or re-submit their response once it has been submitted. Make sure your description clearly communicates this to avoid confusion.
Best Practices and Tips
Writing Effective Descriptions
- Start with a clear one-line summary of what the activity is.
- List rules in a numbered format so they are easy to follow.
- Highlight important dates and deadlines in bold.
- Keep language warm, inclusive, and encouraging.
- Mention any prizes, recognition, or follow-up plans.
Choosing the Right Response Type
- Use Single Image for quick, visual campaigns (selfie contests, event check-ins).
- Use Text Response for reflection-based activities (prayer requests, devotional answers).
- Use Video for testimonial campaigns or talent showcases.
- Use Audio for spoken word, prayer recordings, or podcasting-style content.
Timing Your Activities
- Set a Valid Till date that gives members enough time to participate (at least 1-2 weeks for most activities).
- Announce the activity through other communication channels to drive participation.
- Deactivate the activity after reviewing submissions to keep the app tidy.
Troubleshooting
| Issue | Resolution |
|---|---|
| Activity not visible to members in the app | Check that Active checkbox is ticked. Verify Sub Group and City settings. Confirm Valid Till date has not passed. |
| Image upload fails | Ensure image is exactly 600×360 px and under 512 KB. Try converting to JPG format. |
| Rich text formatting looks broken | Switch to Source view to inspect HTML. Remove copied formatting from Word or Google Docs. |
| Members cannot submit (app shows error) | Verify Valid Till date is still in the future and activity is Active. |
| Changes not saving | Ensure all required fields (marked with *) are filled in before clicking Update. |
| Thank You message not appearing | Confirm Thank You Message field is not empty and re-save the activity. |
Getting Further Help
- Contact your Application administrator or technical support team.
- For feature requests or feedback, submit them through your designated support channel.