Looking for help?
Giving
Giving & Donation
How to Record and Submit Your Contribution: A Member Guide
Church Mobile App | Donation Section
1. Overview
The Giving section of the church app lets you record and submit your financial contributions directly from your phone — at any time, from anywhere. You can log your monthly contributions, one-time offerings, special gifts, and more. You can also track your complete giving history, all in one place.
Here is what you can do in the Giving section:
- Read the church’s Donation Instructions including bank details, UPI info, and how to give by cash or cheque
- Select the family member you are giving on behalf of
- Choose one or more donation categories and enter amounts
- Select your payment method (Cash, Cheque, Bank Transfer, or UPI)
- Complete UPI payments directly through your preferred app (PhonePe, GPay, YONO SBI, etc.)
- Submit your payment details to the church for administrator confirmation
- Update your Unique Transaction Reference (UTR) number or other reference number after completing a digital transfer
- View all your past and pending donations in the Donation List
- Cancel a pending donation entry if needed
📌 NOTE
All donation submissions are subject to confirmation by the church administrator. A donation is fully recorded only after the admin verifies and approves your payment. You will see the status in your Donation List.
2. Finding the Giving Section
- Open the app on your phone.
- From the Home screen, tap the Giving icon or navigate to the Donation / Giving section from the menu.
- The Giving screen will open, showing the Donation Instructions page.
The bottom navigation bar is always visible and contains: Home, Messages, Bible, GoLive, and Alerts. Use the back arrow (‹) at the top left of any screen to return to the previous screen.
3. Donation Instructions Screen
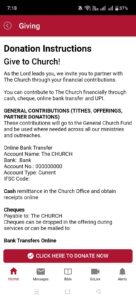
The first screen in the Giving section is the Donation Instructions page. This is where the church provides all the information you need to make a contribution, including:
| Information | What It Tells You |
|---|---|
| Welcome Message (Give to Church!) | A welcome message inviting you to partner with the church through financial contributions. |
| General Contributions | Explains that tithes, offerings, and partner donations go to the General Church Fund to support all ministries and outreaches. |
| Online Bank Transfer | The church’s bank account name, bank name, account number, account type, and IFSC code for direct NEFT/IMPS transfers. |
| Cash | Instructions for remitting cash at the Church Office and obtaining receipts online. |
| Cheques | Specifies who to make cheques payable to and how to submit them (drop in offering or mail). |
| Bank Transfers Online | Additional guidance on using online banking to transfer funds. |
After reading the instructions, tap the CLICK HERE TO DONATE NOW button at the bottom of the screen to begin the donation process.
💡 TIP
Note the bank account details from this screen if you plan to make contributions via NEFT/IMPS outside the app. You can always return here to check the details.
4. Selecting the Member
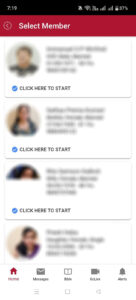
On the Select Member screen, you will see a list of all members associated with your family account (or household account). Each card shows:
- Member’s photo
- Full name
- Role in the family (Head of Family (HOF), Wife, Mother, Daughter, Son, etc.)
- Gender and marital status
- Date of birth and age
- Registered mobile number
Tap CLICK HERE TO START under the name of the member on whose behalf you are making this contribution. The donation will be recorded under that person’s profile.
📌 IMPORTANT
If you are the Head of Family and are contributing on behalf of a spouse, parent, or child, select their name on this screen. Each family member’s giving history is tracked separately in the system.
5. My Giving — Choosing a Contribution Type
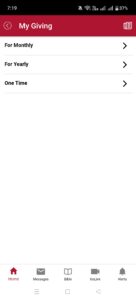
After Selecting the Member, you will arrive at the My Giving screen. This screen shows three giving frequencies:
| Option | When to Use It |
|---|---|
| Monthly Contributions | For recurring contributions paid every month — such as monthly tithes, regular offerings, or monthly building fund contributions. |
| Yearly / Annual Contributions | For annual contributions or pledges made once a year — such as annual harvest festival giving or yearly commitments. |
| One Time | For special, non-recurring contributions — such as a one-off gift, special offering, or a donation in memory of someone. |
Tap the arrow (›) next to the option that matches your contribution to proceed.
6. Subscription Plan — Selecting Categories & Amounts

The Subscription Plan screen is where you choose what you are giving to and how much. You will see a list of all available donation categories for your church (e.g., Monthly Contribution, General Offerings, Thanks Offerings, Poor Fund Offerings, and more).
6.1 Searching for a Category
If your church has many giving categories, use the search bar at the top (Enter search text) to quickly find a specific category by name.
6.2 Selecting a Category
- Tap the checkbox on the header bar of the category you want to give to. The checkbox will turn blue/checked when selected.
- Once checked, the Amount and Months fields for that category become active.
- Enter the Amount in Rupees for that category.
- Enter the number of Months (or periods) this payment covers. For a single month, enter 1. For three months at once, enter 3.
- Select the Period (e.g., Apr-2028) from the dropdown — this is the month/year your contribution applies to.
- Repeat for any additional categories you want to contribute to in the same payment.
💡 TIP
You can select multiple categories in one submission. For example, you can tick both Monthly Contribution and Thanks Offerings and pay both together in a single transaction.
6.3 Viewing the Total
As you fill in amounts, the PAYMENT TERMS button at the bottom of the screen will display your running total (e.g., PAYMENT TERMS 200 ›). This total updates automatically as you add or change amounts across categories. When you are satisfied with your selections, tap PAYMENT TERMS [amount] › to proceed to the payment confirmation screen.
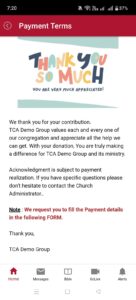
7. Payment Terms — Confirming Your Donation
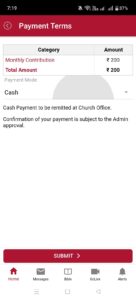

The Payment Terms screen shows a summary of your contribution and lets you select how you will pay. It has two parts:
7.1 Donation Summary Table
At the top of the screen, you will see a table showing Category and Amount.
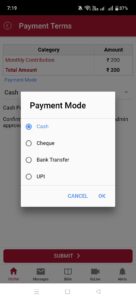
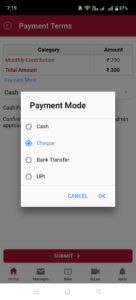
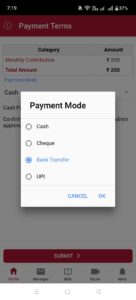
7.2 Selecting Your Payment Mode
Below the summary table, tap the Payment Mode dropdown to choose how you will make the payment. A dialog box will appear with four options:
| Payment Mode | What Happens Next | What You Need to Do |
|---|---|---|
| Cash | Cash payment must be remitted at the Church Office. | Physically bring the cash to the Church Office. |
| Cheque | The app shows instructions for cheque submission. | Write a cheque payable to the church and submit it. |
| Bank Transfer | The app shows instructions for manual bank transfer. There is no auto-payment. | Manually transfer funds via NEFT/IMPS. |
| UPI | The app opens an ‘Open with’ dialog showing your installed UPI apps. | Select your UPI app and complete the payment. |
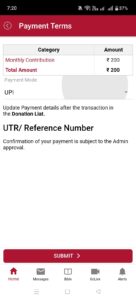
7.3 Payment Mode Instructions
⚠️ IMPORTANT
For UPI and Bank Transfer payments, it is essential to return to the Donation List after completing your payment and add your UTR / transaction reference number. Without this, the church administrator cannot verify and confirm your donation.
8. Completing a UPI Payment
If you selected UPI as your payment mode, here is the complete flow:
- Step 1: Select UPI on the Payment Terms screen.
- Step 2: Tap SUBMIT. The app will show an ‘Open with’ dialog.
- Step 3: Choose your UPI app (PhonePe, GPay, etc.).
- Step 4: Complete the payment in your UPI app and note the UTR number.
- Step 5: Return to the app and navigate to the Donation List.
- Step 6: Tap UTR Number and enter the transaction reference number.
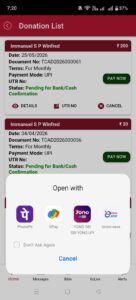
9. Your Donation List
The Donation List is your personal record of all donation entries you have submitted through the app. Each entry card shows Member Name, Amount, Date, Document Number, Payment Mode, UTR Number, and Status.
⚠️ CAUTION
Do not tap CANCEL unless you are certain you want to remove this entry. If you have already made the payment, cancelling the app entry does not reverse the money transfer — contact your church administrator immediately in such cases.
10. Understanding Donation Statuses
| Status | What It Means |
|---|---|
| Pending for Bank/Cash Confirmation | Your submission has been received but not yet verified. |
| Confirmed / Approved | The church administrator has verified your payment. |
| Cancelled | The entry was cancelled. |
💡 TIP
If your donation has been in ‘Pending’ status for more than 3–5 working days, contact your church administrator or treasurer and quote your Document Number.
11. Complete Walkthrough: Making a Monthly UPI Contribution
Here is a complete end-to-end example of how to submit a monthly contribution of ₹200 using UPI.
- Open the Giving section.
- Read Donation Instructions and tap CLICK HERE TO DONATE NOW.
- Select the ‘Monthly’ option.
- Select your member.
- Choose Monthly Contribution category, enter Amount: 200, Months: 1.
- Proceed to payment and select UPI as mode.
- Tap SUBMIT and complete payment in your UPI app.
- Return to the app and add your UTR number in the Donation List.
- Wait for admin confirmation.
12. Giving by Cash or Cheque
If you are submitting cash or a cheque to the Church Office, use the app to create a record of your intention. Follow the steps above but select Cash or Cheque as your Payment Mode.
13. Giving by Bank Transfer (NEFT / IMPS)
Note the church’s bank account details from the Donation Instructions screen. Transfer the amount via your bank app, then complete the Giving flow selecting Bank Transfer as the Payment Mode.
14. Troubleshooting
| Issue | What to Do |
|---|---|
| Name not showing on Select Member screen | Contact the church administrator. |
| UPI app selector did not appear | Check that you have a UPI app installed. |
| Forgot UTR number | Check transaction history in your UPI app. |
| Status ‘Pending’ for several days | Contact administrator with your Document Number. |
15. Quick Reference Summary
| Task | How to Do It |
|---|---|
| Make a monthly contribution | Giving → Donate Now → Monthly → Select Member → Subscription Plan → Payment Terms → Submit |
| Add UTR number after UPI payment | Donation List → find entry → tap UTR Number → enter number |
| View all donations | Navigate to Donation List from the Giving section |
| Cancel an entry | Donation List → find entry → tap CANCEL |
16. Getting Further Help
If you need assistance not covered in this guide, contact your church administrator or treasurer directly. When contacting support, always have your Document Number (from the Donation List card) ready.
— End of Help Article —